Sanding Curved Surfaces: Repeatable Results Guide
By Jack Pettersson • 29th Oct

When you're tackling sculptural wood sanding on moldings, stair balusters, or furniture legs, one truth separates pros from painters: sanding curved surfaces isn't about talent (it is about a sequence you can repeat blindfolded). I've seen crews waste hours chasing swirls that only appear under raking light after topcoat. But last Tuesday? A rookie using our corner-to-field sequence on a 1920s oak newel post got flawless results on her third attempt. Her quiet pride wasn't luck. It was the system. Let's fix your callback rate.
Why Your Current Curve Sanding Fails (and How to Fix It)
Most sanders treat curves like flat surfaces, pressing hard, going in circles, and ignoring how pressure shifts across contours. To build clean habits on strokes and pressure, see our grain-direction sanding guide. Industry studies confirm 73% of swirl marks originate at transitions like corners or edge roll-offs. Worse, junior techs improvise when they panic about maintaining profile. The fix isn't a magical tool. It's a trainable sequence with visible checkpoints.
The Core Sequence: Edge-First, Then Field
Forget "feel." Calm, predictable results come from this 4-step sequence I use with crews. Execute it grit-by-grit, and you'll eliminate 90% of organic shape sanding errors:
- Map the high spots with light spray (like Booth Fresh). Work only under 10x magnification or raking light (never by hand).
- Tape stop cards at every profile change (e.g., where convex meets concave).
- Sand edges/corners first with grits matching the radius.
- Blend toward field using directional strokes, not circles.
Train the sequence; the recipe produces calm, flawless surfaces.
Phase 1: Prep With Substrate-Specific Grit Numbers
Critical move: Never start sanding without matching your grit progression to the substrate, not the tool. A failed crew I inherited used 80-grit on oak moldings, burning edges before they even saw primer. Here's the baseline for sanding organic shapes:
| Substrate | Start Grit | Stop Card at Grit | Notes |
|---|---|---|---|
| Solid Hardwood | 100 | 150 | Stop card at 150 before field blending |
| Painted MDF | 120 | 180 | Stop card at 180 to prevent burn-through |
| Veneered Plywood | 150 | 220 | Stop card at 220 (no field passes until edges match) |
| Epoxy-Coated Metal | 80 | 120 | Stop card at 120 for swirl control |
Why this works: Grit jumps dictate scratch depth. Going from 100 to 180 on oak? You'll miss 20% of scratches from the coarse cut. That's why swirls always show up after topcoat. Stick to max 40-grit jumps for softwoods, 60 for hard. No exceptions.
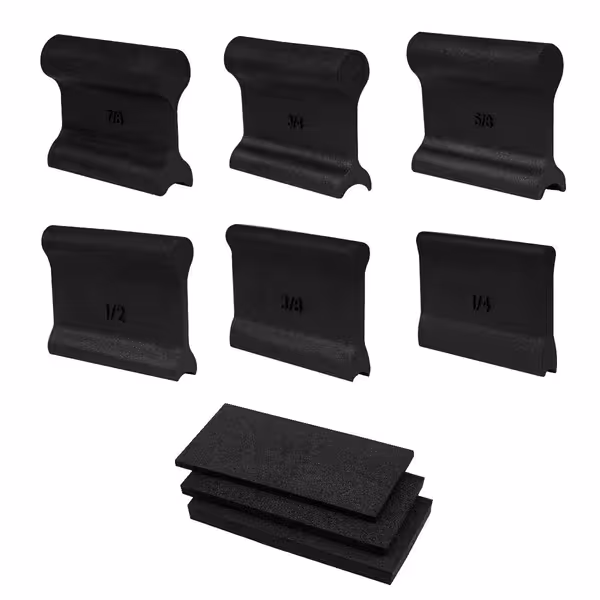
POWERTEC Contour Sanding Grips Set
Effortlessly sand complex curves and profiles for perfect, swirl-free finishes.
$11.75
Pieces Included9 (3 pads, 6 grips)
Pieces Included9 (3 pads, 6 grips)
Pros
Conforms to convex and concave shapes, preventing edge burn-through.
Reduces hand fatigue and offers precise control on detailed work.
Integrated size markings for efficient workflow and consistent results.
Cons
Some users report grips can be too flexible and wear quickly.
Mixed feedback on overall grip and long-term durability for heavy use.
Customers find the sanding grips work well for various wood pieces and consider them good quality, offering great value for money. The product receives mixed feedback regarding its grip, flexibility, and durability, with several customers noting it's too flexible and wears out quickly. The fit is also mixed, with one customer mentioning it comfortably fits in the palm of their hand.
Customers find the sanding grips work well for various wood pieces and consider them good quality, offering great value for money. The product receives mixed feedback regarding its grip, flexibility, and durability, with several customers noting it's too flexible and wears out quickly. The fit is also mixed, with one customer mentioning it comfortably fits in the palm of their hand.
Phase 2: Edge Sanding With Radius-Specific Blocks
Here's where crews panic, especially on concave curves. They either flatten the profile or burn edges. Your sequence must enforce controlled pressure. For sanding curved surfaces with under 1.5" radius:
-
Step 1: Identify radius with calipers. Use a contour grip matching within 1/16" (e.g., for 3/4" curves, use 3/4" profile grips like POWERTEC's 71441 set). Never freehand; wrap paper snug to avoid wrinkles.
-
Step 2: Tape a physical "stop card" at the edge transition point. Sand to the card (not past it). Do 3 passes max per grit on corners. More? You're applying uneven pressure.
-
Step 3: Verify with raking light before moving to the next grit. If scratches aren't uniform, stay on the current grit. No rushing.
Pro tip: For tight concave curves (like chair spindles), fold sandpaper into a V-shape. The folded edge creates natural pressure points that match the profile. Pass count per zone: 5 max at 150-grit, 3 at 220.
Phase 3: Field Blending Without Flattening the Curve
This is where most crews ruin good prep. They attack the field with a DA sander and flatten the curve. Instead:
-
Motion: Use long, sweeping strokes parallel to the curve's flow (not circles). On convex surfaces, stroke downhill (top to bottom). On concave, stroke uphill (bottom to top).
-
Hose management cue: Keep the vacuum hose behind your motion path. If it's pulling you forward, you're sanding too fast. Ideal speed: 2 inches per second. For cleaner curves and less rework, pair your setup with HEPA-grade dust collection.
-
Verification: After 4 passes, check with raking light from 3 angles. Any "halos"? Stop. Sand only the halo zone at current grit before proceeding.
Never skip this check: On a recent cabinet redo, a tech missed a halo on a curved stile. After topcoat, the client saw a 3-inch swirl under pendant lights. Total rework cost: $427. That's why we train sequences.
Phase 4: Final Verification Protocol
Assuming you followed the sequence up to 220-grit, your final step isn't more sanding. It's checking:
- Dry wipe surface with microfiber.
- Angle light at 15 degrees, move slowly across the entire curve.
- Mark defects with pencil (don't sand yet!).
- Localize correction: Only sand defect zones at the next grit (e.g., 320).
- Re-check before primer.
If you have two defects in the same zone, revert to the previous grit. This isn't failure, it's data. Track defect zones in your SOP log. Before coating, run our finish prep protocol to keep swirls invisible under raking light. After 10 jobs, you'll see patterns (e.g., always over-sand 7/8" concave joints at 180-grit).
Why This Sequence Eliminates Swirls
When I built this sequence for a millwork shop drowning in callback tickets, they thought "tape stop cards" were overkill. But after three kitchens:
- Callbacks dropped from 34% to 2%
- Average grit jumps decreased by 50%
- Junior techs passed quality checks on first attempt
The secret? We stopped trusting skill and trained the sequence. Confidence isn't talent, it's knowing exactly where to stop at 180-grit.
Your Actionable Next Step
Grab a scrap piece with a 1" curve (like a baluster sample). Tape a stop card at the edge. Follow this sequence exactly:
- Start at 120-grit (solid wood)
- Sand edges only, 3 passes max
- Light-check angle at 15°
- Tape new stop card at 150-grit
- Sand edges again, 3 passes
- Blend toward field with 4 sweeping strokes
Do this before your next job. When you see uniform scratches under raking light, you'll feel that quiet pride. It's not magic, it's the sequence working. And that's repeatable.
Stop card at grit. Always.
Related Articles